If this is something you haven’t done but want or even need to start, you’ll be glad to know there’s a feature to help you. Here, we’ll show you how to check for accessibility issues in Microsoft Office applications so that your documents are always accessible to others.
About the Office Accessibility Checker
The Check Accessibility feature is available in Office applications on both Windows and Mac and it works the same across the board. For the purpose of this tutorial, we’ll stick with a single application and platform, Microsoft Word on Windows. But you can apply the same steps and principles with the other applications and on Mac. You can use the Check Accessibility feature as you work on your document or when you finish it. There is a handy setting we’ll show you below that will allow the feature to continually check the document as you work on it. So you’re covered either way. Now if you’re ready to start checking your documents for accessibility, let’s get to it!
Use the Check Accessibility Feature
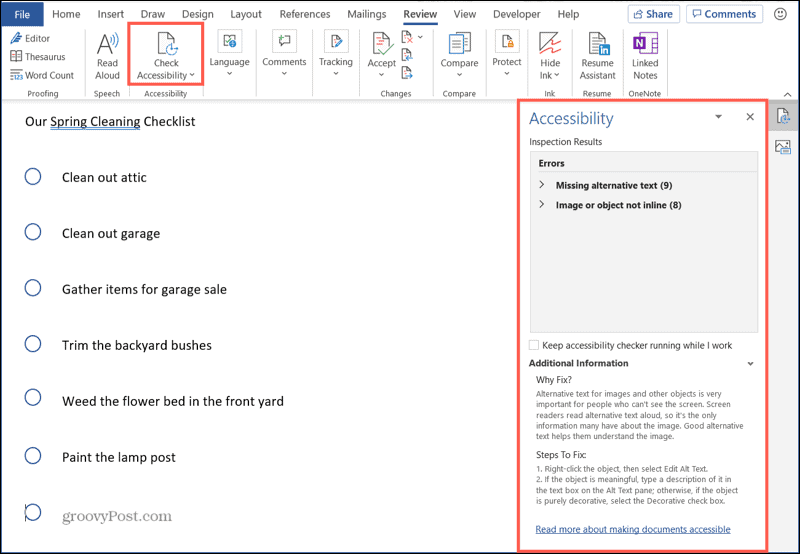
When you want to inspect your document, select the Review tab and click the Check Accessibility button on the toolbar. On Mac, select Tools > Check Accessibility from the menu bar. After the inspector finishes, a sidebar will display on the right with the results. If no issues are found, you’ll see that message. But if the inspector finds errors, those will appear right at the top of the sidebar.
Results and Adjustments for Accessibility
What’s nice about the feature is that it doesn’t just tell you what’s wrong. It gives you details on why you should fix it, how to correct it, and an easy way to make the adjustments. Here’s how that works. When you receive the results, you’ll see things like Errors and Warnings and the number of items that apply. Click an error or warning to expand it and view each item.
You can then select an item in the list to jump directly to it in your document. But first, you’ll also see helpful details under Additional Information at the bottom of the sidebar. This includes Why Fix? and Steps To Fix. So if you question why the item is considered an error, wonder no more!
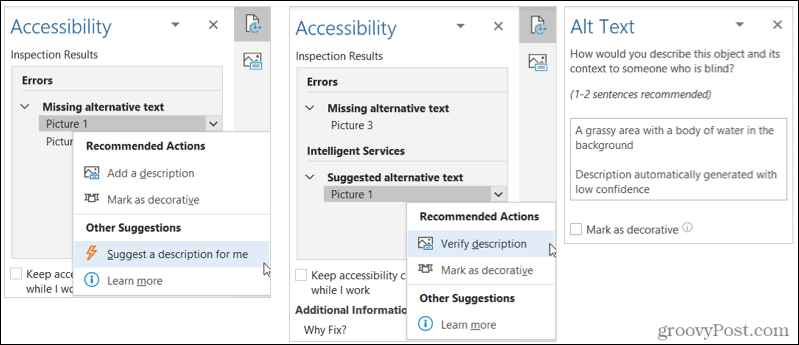
If you want to follow the steps shown to fix the error, you can, but there’s an easier way. Click the drop-down box next to an item in the results list. Then just pick one of the Recommended Actions. Here’s an example. We have two pictures in our document without alternative text. If we click the drop-down box next to Picture 1, we can select Add a description. When the box appears, we add our description, it’s applied to the picture, and the error is fixed.
You may see other actions you can take as well. For instance, we can select Suggest a description for me. The tool will create the alternative text, apply it to the image, and the error is corrected. You can then verify that description for accuracy.
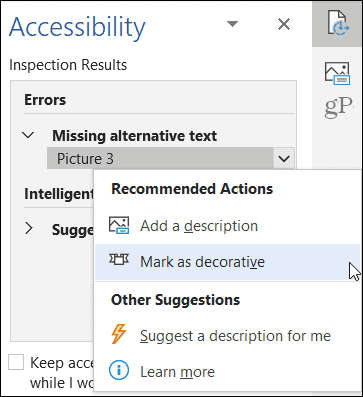
When working with images, you have one more option you can choose which is Mark as Decorative. If the picture in your document isn’t meaningful, for example, maybe it’s a fancy swirl to make your document pretty. You can choose Mark as Decorative and the tool takes care of doing that and removing the error.
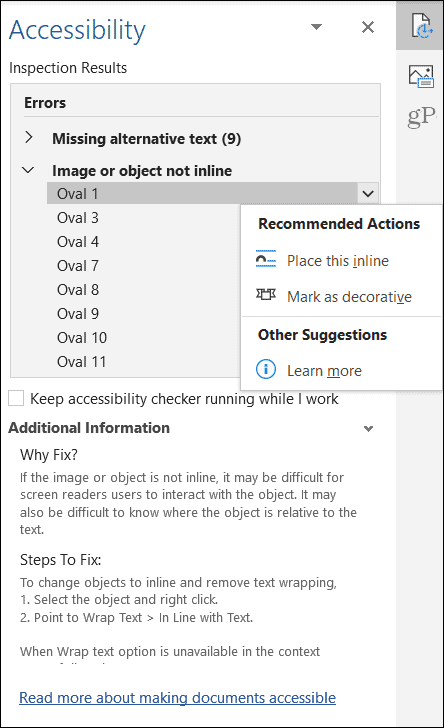
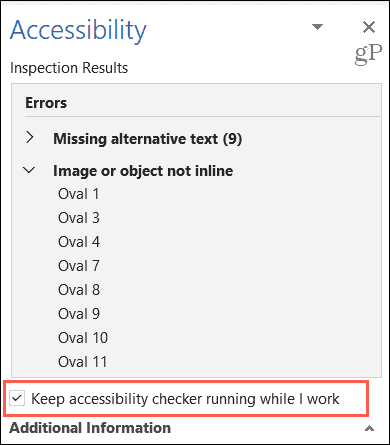
Even though images are some of the biggest culprits with the accessibility checker, you may see all sorts of problems. In the example below, it’s the objects we’re using for our checklist. Again, check the Why Fix? section for the reason and then click the drop-down list next to the item to take action and correct it.
Keep the Accessibility Checker Running
As mentioned earlier, you can use the Check Accessibility feature throughout the document creation process. With the inspector open in the sidebar, look below the list of results. Then, check the box for Keep accessibility checker running while I work.
This gives you a convenient way to make adjustments for accessibility at the same time you add images in Word, sheets in Excel, objects in PowerPoint, or other items.
Take Advantage of the Microsoft Office Accessibility Checker
Those who use screen readers will greatly appreciate you taking the time to make your Microsoft Office documents accessible. It takes only a few minutes and since you have quick and easy ways to correct the issues, it’s worth it. Have a friend, family member, or coworker who could use a helping hand? Check out this list of iOS accessibility features and how they can help.
![]()

